")

Introduction
In today’s tech driven world, building scalable and efficient web applications is a top priority for developers and businesses alike. Python, with its versatility and power, has gained immense popularity in multiple fields of development, including the web. Flask, a lightweight and easy-to-scale microframework, is a preferred choice for building RESTful APIs. When it comes to handling background tasks and queuing, Celery combined with RabbitMQ is a formidable duo. Unlock the potential of Python Flask APIs with Celery and RabbitMQ in this detailed step-by-step guide, where we will walk you through the process of setting up a Python Flask API from scratch with Celery and RabbitMQ on an IIS (Internet Information Services) server.
Table of Contents
Why choose Python Flask APIs?
Python and Flask are a dynamic duo for building APIs, and their versatility makes them an excellent choice in various scenarios. Python’s simplicity, readability, and extensive libraries make it a developer favorite. Flask, a microframework, is lightweight, easy to understand, and highly customizable. It’s an excellent choice when you want to build APIs quickly without unnecessary complexities.
Python’s ecosystem also boasts robust data processing capabilities, which align perfectly with tasks involving data normalization and database operations. Additionally, Python’s extensive community support ensures you’ll find solutions to your challenges quickly. With Flask, you can create APIs that efficiently handle requests, and with Python, you can manipulate data effortlessly. Together, Python Flask APIs provide a solid foundation for creating responsive and reliable APIs.
What is Celery and RabbitMQ?

Celery and RabbitMQ form a powerful combination for handling background tasks and asynchronous processing in Python applications. Celery is a distributed task queue that allows you to offload time-consuming and resource-intensive tasks to separate worker processes. It excels in managing tasks concurrently, making it suitable for scenarios like API requests triggering large data handling functions or compute/time intensive tasks.
RabbitMQ, on the other hand, serves as the message broker for Celery. It efficiently manages the communication between the API and worker processes by handling task distribution and results retrieval. In our setup, Celery will act as the engine that processes the task coming from the API, while RabbitMQ ensures seamless task coordination and communication. This combination provides the reliability and scalability required for background processing while keeping your API responsive.
Pre-Requisites
Before getting into the setup process, let us list out and understand all the pre-requisites of the complete process. The steps to install and set up each requirement will come in subsequent sections:
- Python: Make sure you have Python 3.x (>=3.7) installed on your server. You can download the latest version from the official python website. Make sure the initial install is added to PATH and Install
virtualenvon the global version so that environments can be created for the app to run. - Flask: Since this is a python framework/library, we will be setting this up along with the application that we aim to deploy.
- Erlang OTP: Since we will be using RabbitMQ and it is built on Erlang, we will need Erlang OTP installed.
- RabbitMQ: RabbitMQ is a message broker that Celery uses for task queueing.
- WFastCGI: For deploying Flask applications on IIS, we will need WFastCGI, which will allow us to run Python web applications behind IIS. This can also be installed as a package in python using pip, so we will use that method.
- NSSM: NSSM, or the Non-Sucking Service Manager, is a tool for creating and managing Windows services. It will be used to setup Celery workers as windows services. It can be downloaded from here.
- IIS: IIS comes installed and running on all Windows machines. If not, you can enable it through the “Turn Windows Features On or Off” menu.
Setup Guide
Setting up the python environment and Flask API
Let us first setup our python environment and app that we would be deploying. As Flask is a web framework and runs using python, this step is a necessary first. Since we would be deploying on a windows server, all steps mentioned so forth will be for windows only.
Setting up python
- Download the latest Windows x86-64 executable installer from the official python website.
- Continue with the Install now option. Make sure to check yes, the box for add python to PATH on the first page. If you wish you can choose to customize the installation and set up your global python in a location of your choice. Click “Install”.
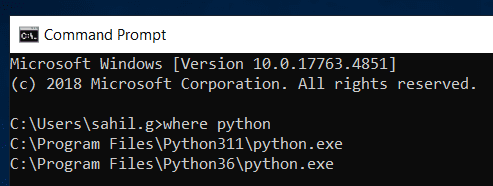
- When the installation is complete, click close. You can verify the installation by running
where pythonin your command prompt (CMD). It should give you a response like so, giving you the path where all and any pythons are downloaded to the machine, and added to the system environment variables.
Setting up IIS with CGI
The Flask app will connect with the FastCGI module of the server to expose the APIs. So, we have to install IIS with CGI. You can follow the below steps to do so:
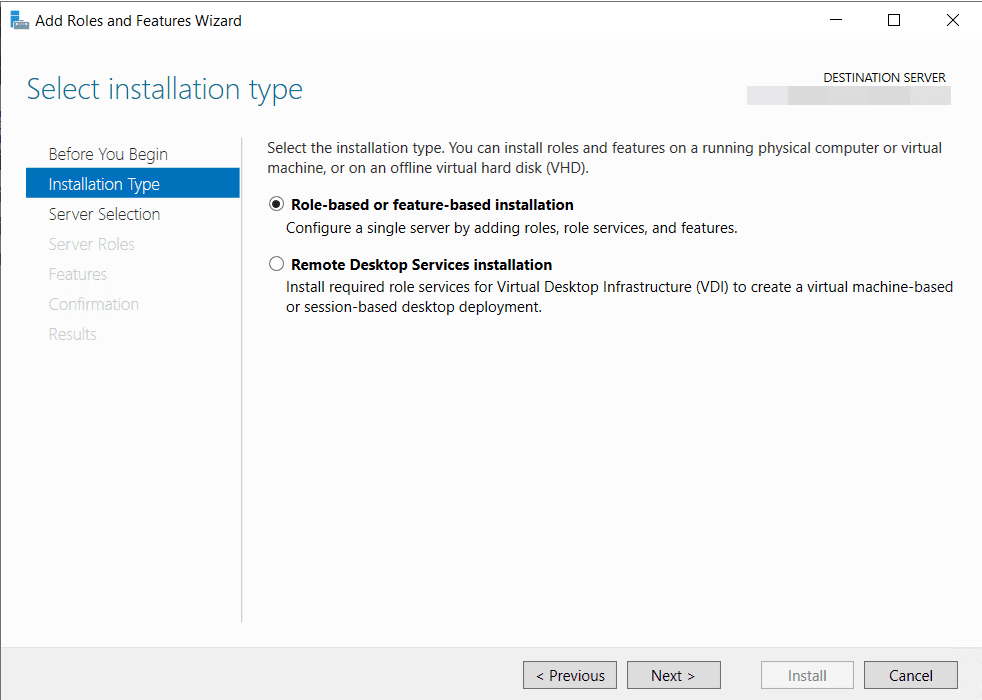
- Open Server Manager and select Manage -> Add Roles and Features

- You will see the before you begin page. Click next and select “Role-based or feature-based installation” in the Installation type section and click Next.
- Select the server in the “Server Selection” section and select “Next”.

- On “Server Roles”, select “Web Server (IIS)”, select “Add features” and select “Next”.
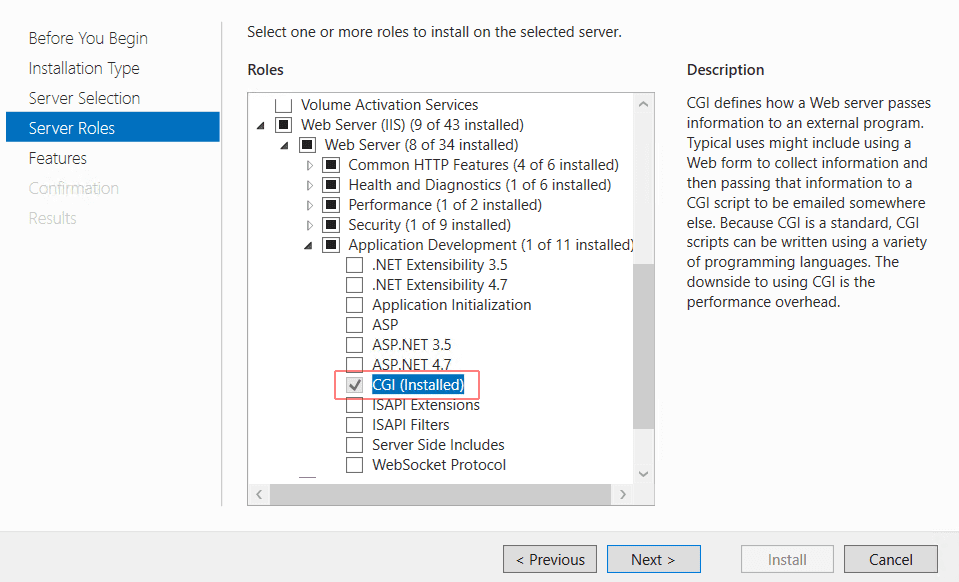
- Accept the default configurations and continue till we see the “Role Services” screen. Select “CGI” under “Application Development” and select “Next”.
- Accept the default configurations and select “Install”.
After the installation is complete, close the installation wizard and launch IIS manager by using the command inetmgr
Setting up the Flask API and the python environment
Now that we have python setup, lets setup our Flask API. If you already have an application hosted on a version control system, you can use git to get the repository onto the server at the following path:
C:/inetpub/wwwrootThis is required as to deploy a web app on IIS, the app is required to be in this folder for it to be read by IIS. For the sake of this guide, we will be using the following piece of code as our Flask app:
"""
Deploy Flask App in IIS Server
"""
import time
from flask import Flask
from celery import Celery
app = Flask(__name__)
app.config[‘CELERY_BROKER_URL’] = ‘pyamqp://guest:guest@localhost:5672/’
app.config[‘CELEREY_RESULT_BACKEND’] = ‘rpc://guest:guest@localhost:5672’
celery = Celery(app.name, broker=app.config[‘CELERY_BROKER_CONFIG’, backend=app.config[‘CELERY_RESULTS_BACKEND’])
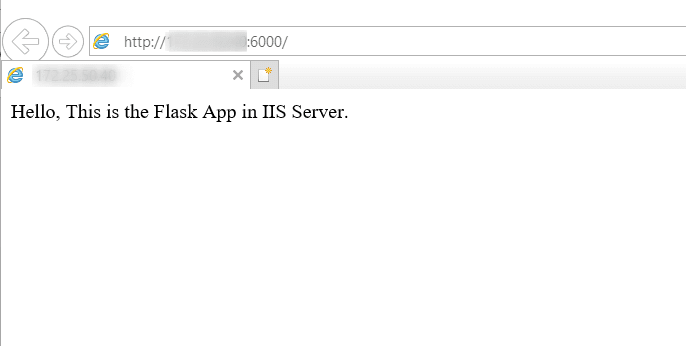
@app.route("/")
def home():
background_task = hello.delay()
return "Hello! This is our Flask App in IIS Server."
@celery.task
def hello():
time.sleep(30)
print(“hello”)
"if __name__ == "__main__":
app.run()- Create a folder in
wwwrootwwwroot - Open CMD as Admin and as a pre-step, run the command
where pythonand copy the path to the python.exe file for the required python version. If there are different versions present from other apps running on the server, make sure to select the python version we just downloaded. run the following command to create a virtualenv. Before doing so, navigate to the folder where to code is present in CMD, a.k.a.C:inetpubwwwrootFlaskApp
Path/to/python.exe -m venv env
envScriptsactivate- Now that we have our virtual environment and code set up, we can install our packages into the env. If you have a requirements.txt folder, run the command
pip install -r requirements.txt, or you can directly use pip install in the CMD. Install the following packages using the command:
pip install flask wfastcgi celeryThis will install all packages required for our basic code and we can then move on to setting up Celery, RabbitMQ and deploying our app to IIS.
Setting up Erlang and RabbitMQ
Erlang OTP
- From the official version tree of Erlang, download the latest stable version & install using an administrative user.
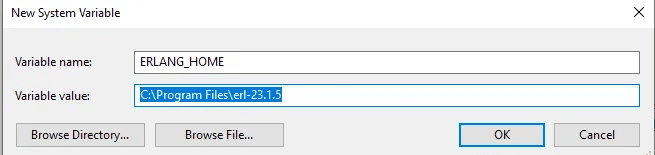
- Set ERLANG_HOME to where you actually put your Erlang installation, e.g., C:Program Fileserl{version} (full path, we have version=23.1.5). The RabbitMQ batch files expect to execute %ERLANG_HOME%binerl.exe.
- Go to Start > Settings > Control Panel > System > Advanced > Environment Variables. Create the system environment variable ERLANG_HOME and set it to the full path of the directory which contains binerl.exe.
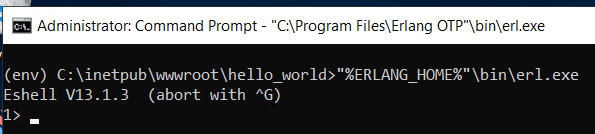
- Open CMD and type
"%ERLANG_HOME%"binerl.exe. You should see an E-Shell prompt.
RabbitMQ
- download the RabbitMQ installer, rabbitmq-server-{version}.exe and run it using the following command.
cd C:Program FilesRabbitMQ Serverrabbitmq_server-3.11.6sbin
rabbitmq-plugins.bat enable rabbitmq_management- After the above 2 commands, run this command.
rabbitmq-plugins enable rabbitmq_shovel rabbitmq_shovel_management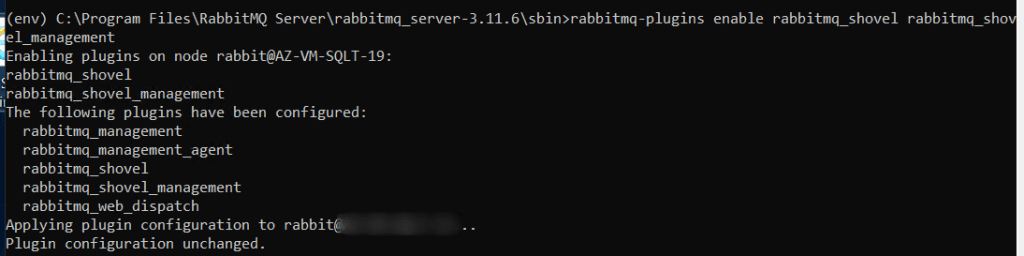
- Open Windows search, search for notepad and right click to select “Run as administrator”. Search for and open
C:WindowsSystem32driversetchostsfile. Add to it the following line, and save:
127.0.0.1 rabbitmq- Once all done, open
http://rabbitmq:15672/on a web browser for opening the RabbitMQ management. The default credentials are always as follows:
Username: guest
Password: guest
Setting up Celery
In our Flask app – app.py, we have already added all necessary configurations and functions to set up celery, use RabbitMQ as a task broker on the port 5672, and added a function that will get called in the background asynchronously from the actual API call.
To make all of this happen, we need what is called a worker. A celery worker is responsible for executing asynchronous tasks in the background. The worker listens to the task queue, which in this case is RabbitMQ, waits for oncoming tasks, and once a task is received, it processes it independently from the main application.
The worker will need admin permissions since our complete code base is in the C drive. To achieve this and help run the worker, we will create a windows batch file. The following steps can be used to create the batch file:
- Open a text editor, like notepad.
- Add the following commands in the first 2 lines of the file.
@REM #run as admin
cd "C:inetpubwwwrootFlaskApp"&&envScriptsactivate&&celery -A app.celery worker --pool=solo -l info
The first line here will tell the batch file to be opened as admin, and the second line will in order, go to the code directory, activate the python environment, and then call the celery configuration stored in our app.py file to create a worker.
- Save the text file, preferably in the Folder with the rest of the code. Name it as celery_worker.bat and keep the “Save as” type as “All Files (*.*)”.
To set up the worker to run indefinitely, we will be using NSSM, or the Non-sucking service manager. It is a 3rd party open-source tool that allows us to convert batch/executable files into windows services.
Setting up NSSM and the windows service
- Download nssm. Follow the steps as mentioned on website for download.
- Unzip the contents, go to “nssm-2.24win32” and copy-paste the executable into any external folder. There are no other installation steps required. This external folder should be added to PATH environment variable. It should be a user variable.
Now that we have NSSM set up, we will go ahead and create the service using the celery_worker.bat file we created earlier.
- Open CMD as admin
- Run the following command in CLI
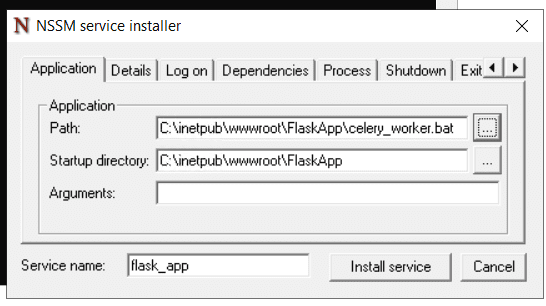
nssm install service_nameIn this case, service_name = flask_app
- This will open a service installer window and all aspects of the service can be configured/edited from here.
- In the “Application” tab, Path should be pointed to the batch file to be run indefinitely, in this case the celery_worker.bat.
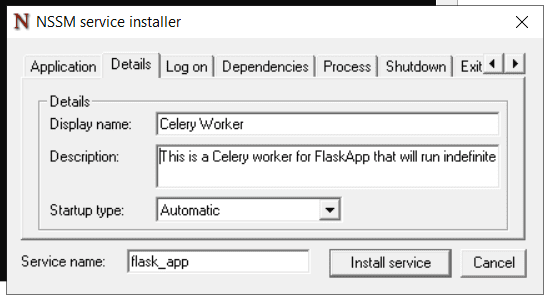
- Go to the details tab and add an appropriate name, description, and keep the startup type as “Automatic”.
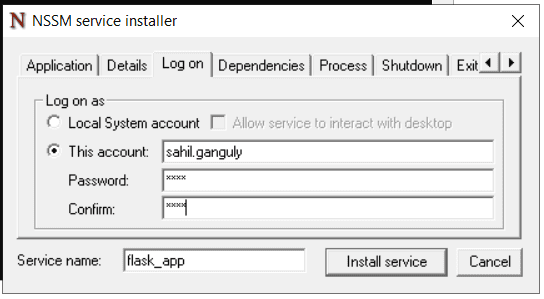
- Go to the log on tab and select “this account” enter your credentials here, or if you have a service account for the server with appropriate access and permissions, add the credentials to that account here. This account will be used to run the service. The rest of the configurations are optional in the rest of the tabs and can be added as required (such as logging from the I/O tab and File rotation to rotate the log files).
- Click finish and the service will get installed. For the first time, the service would be stopped and will have to be started manually by going to the “Services” application, locating the service and clicking start. On system startup/reboot, it will start automatically because of the slection done in step 5.
Deploying Application with IIS and WFastCGI
Now that we have all the other aspects of the project up and running, we can get to deploying the API on IIS, which will allow users to run the API through a port on the server. If you have one, you can also add a domain to the web app we will set up now –
Setup website to point to folder
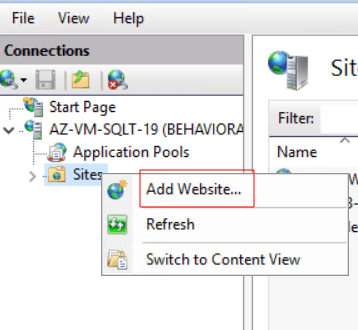
- Open the IIS application and go to Sites. Right click and click on Add new website.
- Give a name to your website and set the physical path to your project directory. Assign a port number and click ok. If you have a domain name, you can add that as well in the “Host name” field.

Add permissions to IIS
- Open CMD as admin, navigate to the app directory, and activate the environment. run the following 2 commands to give appropriate permissions to IIS to run the code in the folder:
icacls . /grant "NT AUTHORITYIUSR:(OI)(CI)(RX)"
icacls . /grant "BuiltinIIS_IUSRS:(OI)(CI)(RX)"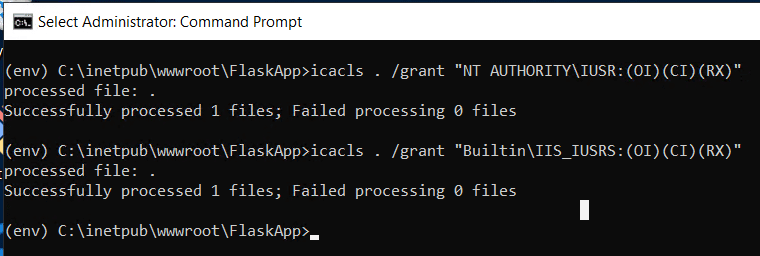
Add Handler Mappings
- On IIS, go to the FlaskApp site, present under Sites. Click on that and select the “Handler Mappings” icon.
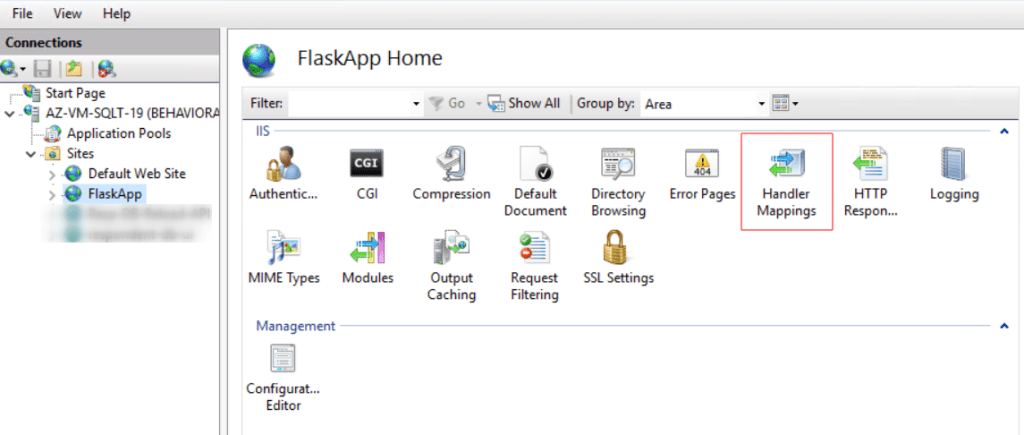
- Here, select “Add Module Mapping” and insert the following values:
Request Path: *
Module: FastCgiModule (Select from the dropdown menu)
Executable(optional):
C:inetpubwwwrootFlaskAppenvScriptspython.exe|C:inetpubwwwrootFlaskAppenvLibsite-packageswfastcgi.py
Name: FlaskHandler

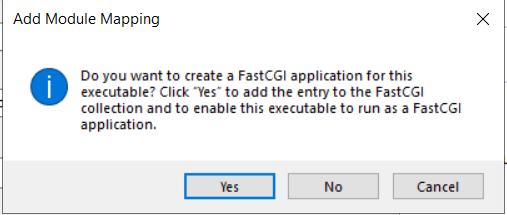
- Click on Request Restrictions and uncheck “Invoke handler only if request is mapped to:” checkbox and select OK, followed by another OK. Select “Yes” if prompted by this warning.
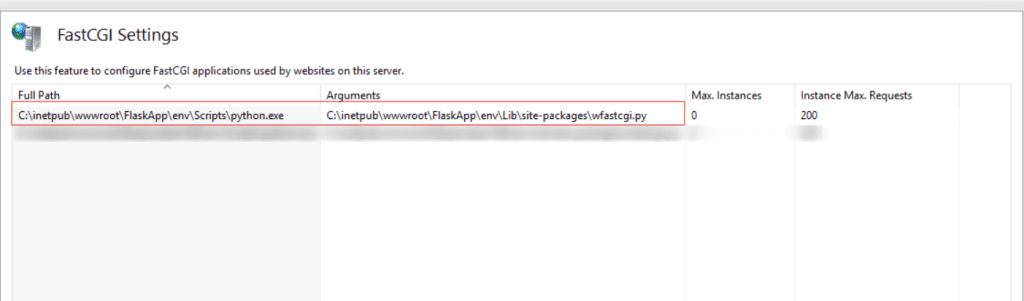
- Now, verify the module mapping in FastCGI settings in the root server. This should create an entry in FastCGI Settings.
Update the FastCGI Application
- Double click the application entry in FastCGI settings to edit the application and select “Environment variables”. Click on “…” and open the “EnvironmentVariables Collection Editor”. Add the below entries:
Name: PYTHONPATH
Value: C:inetpubwwwrootFlaskApp
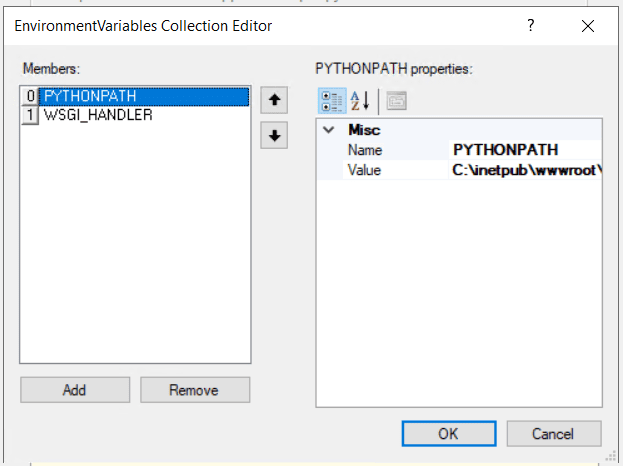
The PYTHONPATH must point to the directory containing the Flask Application.
Name: WSGI_Handler
Value: app.app
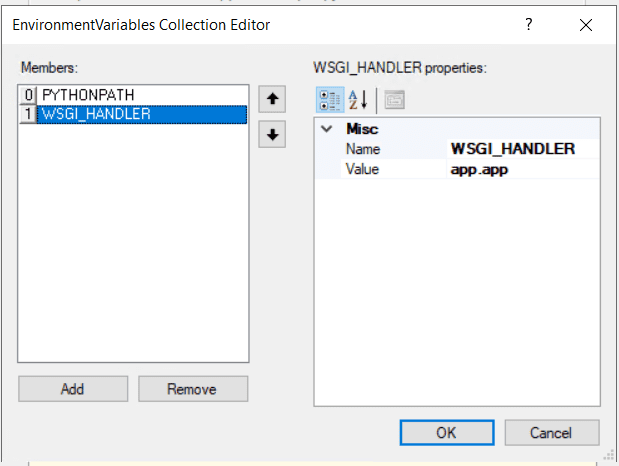
The WSGI_HANDLER must point to the application name followed by “.app”. In our case, the application name is “app.py” so WSGI_HANDLER is pointing to “app.app”.
Your website is now ready to use over the port you set at the beginning of the website setup on IIS. Enjoy!
Conclusion
Setting up a Python Flask API with Celery and RabbitMQ on IIS can be a complex and lengthy task, but it’s a powerful combination for building robust web applications that can handle background tasks and queueing efficiently. By following this step-by-step guide, you’ve learned how to configure each component and integrate them into a seamless web application. With the right setup, your Flask app can now handle concurrent tasks and deliver a smooth user experience while processing background jobs asynchronously. This combination opens up a world of possibilities for building feature-rich and efficient web applications.