

Today, most businesses struggle with data silos, where valuable information is trapped in different systems. Perhaps, that’s why connecting your D365 Sales data with your ERP is crucial for success.
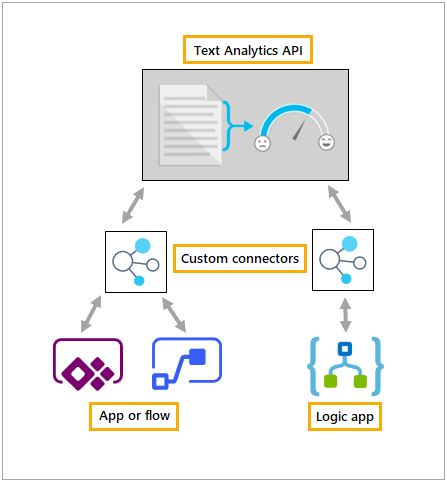
You can unlock insights and streamline your operations by bridging the gap between Dynamics 365 Sales and your ERP. This is where the use case of custom connectors for MS CRM in the Power Platform shines.

Imagine seeing real-time inventory levels in your CRM while talking to a customer. Or picture your sales team accessing up-to-date pricing information from your ERP without switching screens. These scenarios become a reality when you harness the capabilities of Power Apps and create a custom connector.
Custom Connector for D365 Sales
Before we roll up our sleeves and build our custom connector in the Microsoft Power Platform, let’s ensure we have all our preparations in a row.
Here’s what you’ll need to get started:
- The Right Permissions: First, you’ll need the proper access to your D365 environment. Ensure you have admin rights in your CRM and the Power Platform. Without these, you’ll be stuck at the starting line.
- API Documentation: This is like the instruction manual for your ERP system. You’ll need to know how to “talk” to your ERP, and the API docs will tell you just that. Look for things like endpoints, methods, and data formats. Don’t worry if this sounds techy – we’ll break it down later.
- A Power Platform Environment: You’ll be working in the Microsoft Power Apps part of the Power Platform to create your connector. Make sure you’ve got access to a development environment where you can safely test things out.
- Your CRM Sales Instance: This one’s a no-brainer, but worth mentioning. You’ll need access to your CRM Sales system to test the integration.
- ERP System Access: You’ll need the right credentials to connect to your ERP. This might include things like API keys or OAuth credentials. Check with your IT team if you’re not sure.
Got all that? Great! With these prerequisites in place, you’re all set to start creating your connector.
How to Create a Custom Connector for D365 Sales
For creating connectors, we’ll be using Power Apps within the Power Platform to make this magic happen.
- Define Your Connector: First, hop into your Power Apps maker portal. Look for the “Custom Connectors” option in the left menu. Click “New connector” and give it a name that makes sense, like “CRM to ERP Connector.”
- Set Up Authentication: This is where you tell your connector how to securely access your ERP. In the “Security” tab, choose the auth type your ERP uses. It might be API Key, OAuth 2.0, or something else. Fill in the required fields based on your ERP’s documentation.
- Define Actions and Triggers: Now for the fun part! In the “Definition” tab, you’ll create actions that your MS CRM can use to interact with your ERP. Think “Get Customer,” “Update Inventory,” or “Fetch Invoice.” For each action:
- Click “New action”
- Give it a clear name and description
- Define the request (what info CRM will send) and response (what the ERP will send back)
- Use Swagger to Speed Things Up: If your ERP provides a Swagger file (a special file that describes APIs), you can upload it to auto-fill a lot of this info. It’s like a cheat code for connector creation!
- Test Your Connector: Before you unleash your creation on the world, give it a test drive. In the “Test” tab, you can try out each action you’ve created. Make sure everything’s working as expected with your CRM’s data.
- Create Your Connector: Happy with how it’s working? Great! Hit that “Create connector” button. Your connector is now ready to use in Power Apps and Power Automate flows.
Remember, creating a custom connector is more art than science. You might need to tweak things as you go along. That’s normal! The key is to start simple and build up.
How to implement Custom Connector in Power Automate
Now that we’ve built our connector, it’s time to put it to work! We’ll use Power Automate, another awesome tool in the Power Platform, to create a flow that connects your CRM with your ERP.
- Create a New Flow: Head over to Power Automate and click “Create.” Choose “Automated cloud flow” to get started. We want this to run automatically, right?
- Pick Your Trigger: For this example, let’s say we want to sync customer data when a new account is created in CRM. Search for your CRM in the trigger list and select “When a record is created.”
- Configure the Trigger: Choose “Accounts” as your entity. This tells Power Automate to watch for new accounts in your MS CRM.
- Add Your Connector: Click “New step” and search for your custom connector. You should see the actions you created earlier. Let’s pick “Create Customer in ERP” (or whatever you named your action).
- Map the Fields: Here’s where the magic happens! You’ll map fields from your CRM account to the corresponding fields in your ERP.
- Add Error Handling: Nobody’s perfect, and sometimes things go wrong. Add a “Condition” action to check if the ERP action was successful. If it wasn’t, you could add steps to notify someone or retry the action.
- Test Your Flow: Before you set it loose, test your flow! Create a test account in your CRM and watch the magic happen. Check your ERP to make sure the data came through correctly.
- Turn It On: Turn on your flow and watch as your CRM and ERP start talking to each other like old friends.
Remember, integrating systems is an ongoing process. Don’t be afraid to refine and improve your setup as you learn what works best for your business.
Team Osmosys
Conclusion
Creating a custom connector in the Power Platform to integrate your CRM with your ERP system is just the beginning of your journey with the Power Platform and MS Dynamics. Here are some next steps to consider:
- Expand Your Integration
- Explore Power Apps
- Dive more into Power BI
Remember, the goal here isn’t just to connect systems – it’s to make your business run smoother, make your team more efficient, and ultimately, to serve your users better. Connect with the CRM experts to make your journey smoother and effective.